HelpCapture
Mark up a screenshot
Add arrows, text, numbered steps, blur, a magnifier or a spotlight, and copy or save the result.
The editor lets you add arrows, text and numbered steps to a screenshot, hide what is private, and copy the result in one go. Your marks stay editable until you copy or save. The same tools work on pictures in your Library on the web: see Mark up a picture on the web.
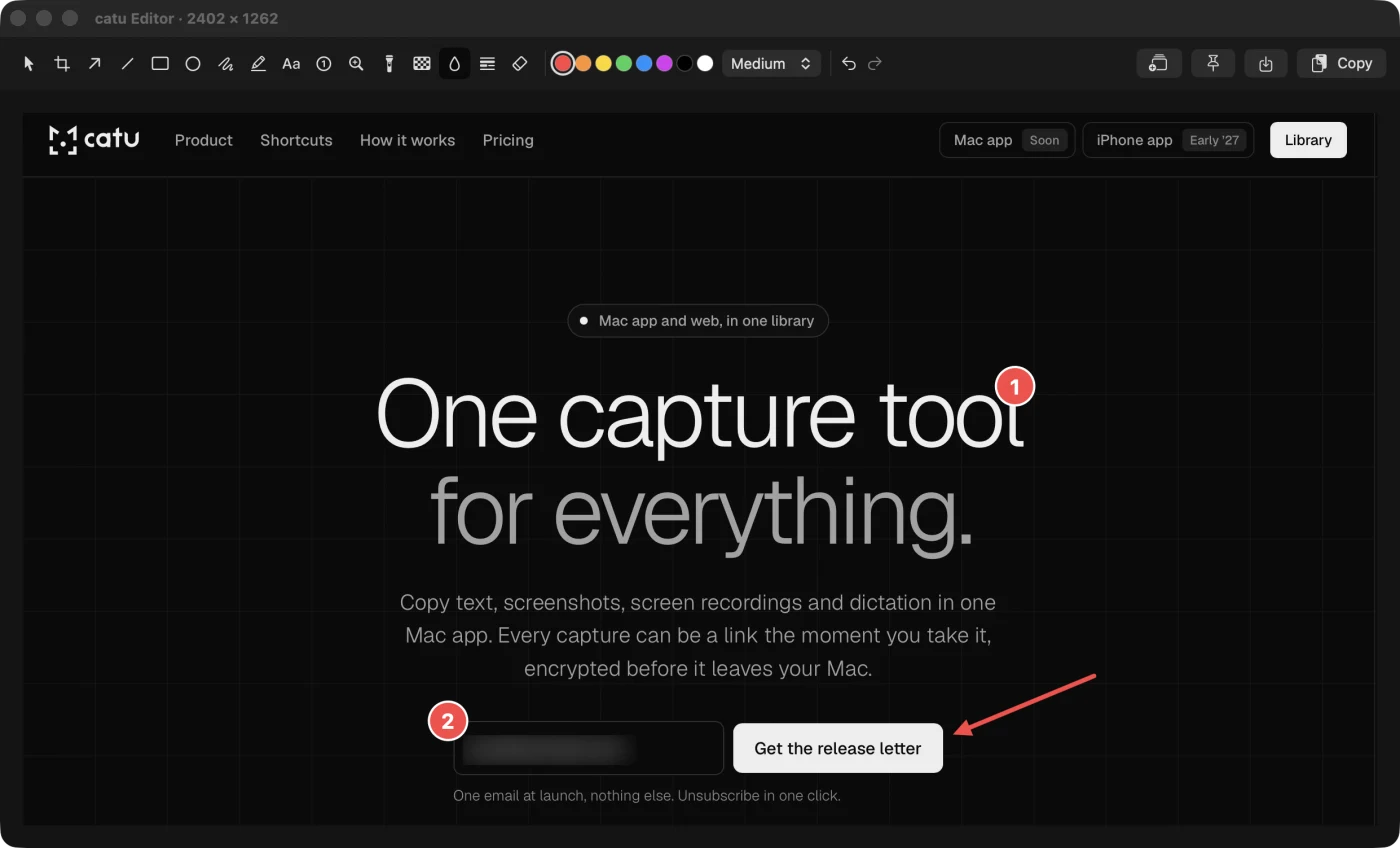
Open the editor#
You can open a screenshot in the editor in several ways:
- Click the preview, or the Edit button, on the card that appears after a screenshot.
- Click the catu icon in the menu bar, then click “Edit Last Screenshot…”.
- In your clipboard history, hover over an image and click “Edit”. This works for any image you copied, not just screenshots.
The window title shows the image size in pixels, for example catu Editor · 2560 × 1600.
The tools#
The tools sit on the left of the toolbar. Click one, or press its letter while the image is selected. Hover over a tool to see its name and letter. The editor opens with Arrow selected.
| Tool | Key | How to use it |
|---|---|---|
| Select | V | Click a mark to select it, then drag to move it. Press Delete to remove it. |
| Crop | C | Drag the area to keep, then press Return. |
| Arrow | A | Drag from the tail to the point. Hold ⇧ to snap it to horizontal, vertical or 45°. |
| Line | L | Drag from one end to the other. Hold ⇧ to snap it to horizontal, vertical or 45°. |
| Rectangle | R | Drag a box. Hold ⇧ for a square. Hold ⌥ while dragging to add a light fill in the same colour. |
| Oval | O | Drag an oval. Hold ⇧ for a circle. |
| Pen | P | Draw freehand. |
| Highlighter | H | Draw over text like a highlighter pen. The text underneath stays readable. |
| Text | T | Click where the text should go, type, then press Return. Esc cancels. |
| Step number | N | Click to place a numbered circle. Each click adds the next number: 1, 2, 3… |
| Magnifier | M | Drag over a small detail. An enlarged copy appears next to it, joined by a line. |
| Spotlight | S | Drag over what matters. Everything else is dimmed. Add several to light up more than one place. |
| Pixelate | X | Drag over something private. It is covered with large blocks. |
| Blur | B | Drag over an area to soften it. |
| Hide text only | D | Drag over an area. catu finds the lines of text inside it and pixelates only those, leaving icons and layout visible. |
| Remove object | E | Drag over something you want gone. catu fills the area from its surroundings. |
To hide passwords, email addresses or account numbers, use Pixelate or Hide text only. Their blocks are too coarse to read back. A blur looks softer but can sometimes be partly undone.
Text#
Text is bold, with a thin white outline so it stands out on any background. It uses the colour you have chosen. Once placed, text can be moved, recoloured or removed with Select, but not retyped: remove it and add it again.
Magnifier#
The enlarged copy is twice the size of the area you dragged, and catu places it beside that area. To put it somewhere else, switch to Select and drag the enlarged copy. The outline on the original area stays where it is.
Hide text only#
If catu finds no text where you dragged, it shows “No text found there” and nothing is added. Use Pixelate instead.
Remove object#
This works best on plain or gently shaded backgrounds, such as removing a notification badge, a cursor or a name from a toolbar. On busy pictures the filled area comes out smooth rather than invisible.
Colours and line width#
Next to the tools are eight colours: red, orange, yellow, green, blue, purple, black and white. Red is chosen when the editor opens.
The menu next to the colours sets the line width: Thin, Medium or Thick. It changes how thick arrows, lines, shapes and pen strokes are, and how big step numbers are.
To change a mark you have already drawn:
- Choose Select (V) and click the mark.
- Click a colour, or choose a width.
The selected mark changes at once.
Crop#
- Choose Crop (C).
- Drag over the part you want to keep. The size is shown with “Return to crop”.
- Press Return.
Everything outside the area is removed when you copy or save. After cropping, the editor switches to Select. To get the full image back, use Undo (⌘Z).
Undo, redo and delete#
- Undo (⌘Z) and Redo (⇧⌘Z) are also buttons in the toolbar. You can undo every step back to the original, including crops.
- To remove one mark, choose Select, click the mark and press Delete.
- Esc deselects the current mark or cancels a crop.
Combine screenshots#
You can join two or more images into one, for example to show a before and after.
- Click the “Combine with another screenshot” button on the right of the toolbar.
- Under “Add below” or “Add to the right”, pick one of your recent images from the history, or click “From File…” to choose an image file.
The image is added below or to the right, on a white background. You can keep adding more. Undo takes the last one away again.
Combining undoes any crop, but keeps your marks. Combine first, then crop.
Copy, save or pin the result#
When you are happy with the result, choose what to do with it. Your marks are flattened into the image at this point.
| Button | Shortcut | What it does |
|---|---|---|
| Copy | Return or ⌘C | Copies the edited image, adds it to your clipboard history and closes the editor. catu shows “Edited screenshot copied” with the size. |
| Save (arrow into a tray) | ⌘S | Saves the edited image as a new file in your screenshots folder. The editor stays open. The original file is not changed. |
| Pin (pin) | — | Opens the edited image in a small window that floats above everything else. |
To share the edited image as a link, copy it first, then hover over it in your clipboard history and click “Copy share link”. Sharing needs the Web app plan: see Share a capture as a link and Plans and billing.
Pinned images#
A pin keeps a picture in view while you work, for example a design to copy or numbers to type in somewhere else.
- Drag it to move it.
- Scroll over it to make it bigger or smaller.
- Hold ⌥ and scroll to make it see-through.
- Double-click it to copy it. catu shows “Pin copied”.
- Click it, then press Esc to close it.
You can have up to ten pins. Opening another closes the oldest one. Pins close when catu quits.
Zoom and other keys#
| Key | What it does |
|---|---|
| ⌘+ and ⌘− | Zoom in and out |
| ⌘0 | Actual size |
| ⌘1 | Fit the image to the window |
| ⌘Z, ⇧⌘Z | Undo, redo |
| Delete | Remove the selected mark |
| Return or ⌘C | Copy and close |
| ⌘S | Save a copy to the screenshots folder |
| Esc | Deselect, or close the editor when nothing is selected |
| ⌘W | Close the editor |
You can also pinch on a trackpad to zoom.
Mark up a picture on the web#
Pictures in your Library on catu.app can be marked up with the same tools, letters and colours as on the Mac.
- Open the picture in your Library.
- Click “Mark up” at the top, next to “Share”. GIFs can't be marked up, because saving would stop them moving.
- Pick a tool on the left, or press its letter. Colours, “Thin”, “Medium” and “Thick” sit above the picture. With Rectangle, choose “Outline” or “Filled” there.
- Click “Save”, or press ⌘S.
A few things work slightly differently from the Mac:
- Text: click, type, then press Return. To change a text you already placed, choose Select and double-click it.
- Hold ⇧ while dragging an arrow or a line to snap it to 45°, or while dragging a box to make it square.
- Crop: choose a shape (“Free”, “1:1”, “4:5”, “9:16”, “16:9”, “4:3” or “3:2”), drag, then click “Crop” or press Return. The rest of the picture stays visible but dimmed until you save. “Uncrop” gives the whole picture back.
- Undo and redo: ⌘Z and ⇧⌘Z. Delete removes the selected mark.
- “Copy” puts the marked-up picture on your clipboard without saving it.
- Hide text only reads the text in your browser. The first time, it loads a text reader of about 7 MB. The picture never leaves your browser to do this.
“Save” draws your marks into the picture and replaces it. Its link stays the same, and everyone who opens it sees the marked-up picture. Anything you pixelated, blurred, removed or cropped away is gone from the picture itself, not just covered, so nobody can uncover it. After saving, the marks can't be changed. To start again, take or upload the picture again.
If you close the editor with unsaved marks, catu asks before leaving.
If something doesn't work#
- Your marks disappeared when the editor closed. Esc and ⌘W close the editor without copying or saving, and there is no warning. Use Copy or Save first. The original screenshot is still in your history and in the screenshots folder, so you can open it again.
- Pressing a letter does not switch tools. The letters work when the image has focus. Click on the image once, or finish typing the text you are adding with Return.
- “No text found there” with Hide text only. catu could not find text in that area. Drag over a larger area, or use Pixelate.
- “Combined image would be too large”. The joined image would be bigger than catu can handle. Combine fewer or smaller images.
- A mark is the wrong shape. Marks can be moved and restyled, but not reshaped. Select it, press Delete and draw it again.
- There is no “Mark up” button on the web. It appears on your own pictures, not on recordings, GIFs or other people's clips.
- “The text reader could not start here” on the web. Your browser could not run the text reader. The area is pixelated whole when you save, so nothing in it stays readable.
- The picture is unchanged after saving on the web. Reload the page. Someone who opened the link before you saved may need to reload too.
Checked against the app on 29 October 2026.
Still stuck? Write to us and we’ll answer, and fix this page if it let you down.
Get help